In this post update, I show you how to solve “Error Please Unplug Charger” and more solutions that can be of great help just incase you have found yourself in this mess that takes over your phone and makes it almost useless. While this problem surfaces, it might be minor on one-hand or severe on the other-hand, which ever the case is, it is hoped that one or more of the solutions offered here would fix the issue at hand.

Other Variations or Forms of this Warning Message
Depending on phone brand or configurations, in some cases the warning messages could also display as “Error Plug Out Charger”, “Error Please Plug Out Charger” “Charge Error” etc. Below are some of the steps you can take in order to find a way around solving this unpleasant surprise!
Steps To “Fix Error Please Unplug Charger” And “Charging Error Problems”
- Firstly, for “Charging Error, you should try to check with another working battery.
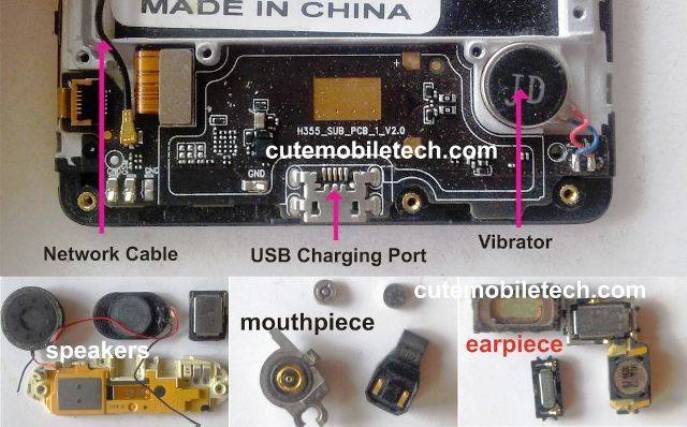
- Check your charging port for moisture, dirt or debris, clean-up or replace charging port or the entire charging base sub-panel (PCB).
- Check your phone’s battery flakes and connector that connects to battery terminal socket on your PCB. When the BSI line of the battery flakes has a cute either visible or invisible, it can result in this Error Please Unplug Charger issues. So you need your multi-meter to check for flakes or battery connector open.
- Check your BSI (Battery Size Indicator) terminal and make sure it is not having partial contact with its point or base on the PCB. If not firm or well soldered on the PCB, then re-solder firmly.
- Using your multi-meter, (download multi-meter eBook here) check if BSI has continuity with VBAT or GND and make sure to disconnect such relationship where a bridge exist (usually indicated by a beep sound) when multi-meter is set in buzzer mode.
- Check your BSI diode for short, if BSI diode is short, then remove. (replace same if available though it will still work in absence).
- Check BSI Resistor: if resistance is lost or BSI resistor is missing ensure to replace same or equivalent values.
- If you have done all of the above without success, then you should be ready to troubleshoot for the specific BSI IC for your phone using the avatar or schematic diagram, block diagrams and service manual to spot it and replace accordingly, (download and learn how to trace and fix phone problems using schematic diagram and others here).
Download this eBook if you are a newbie to scale-up your skill.
More Pictorial Update soon on this, spread the love!